Vue3 + Element3 学习过程简单记录
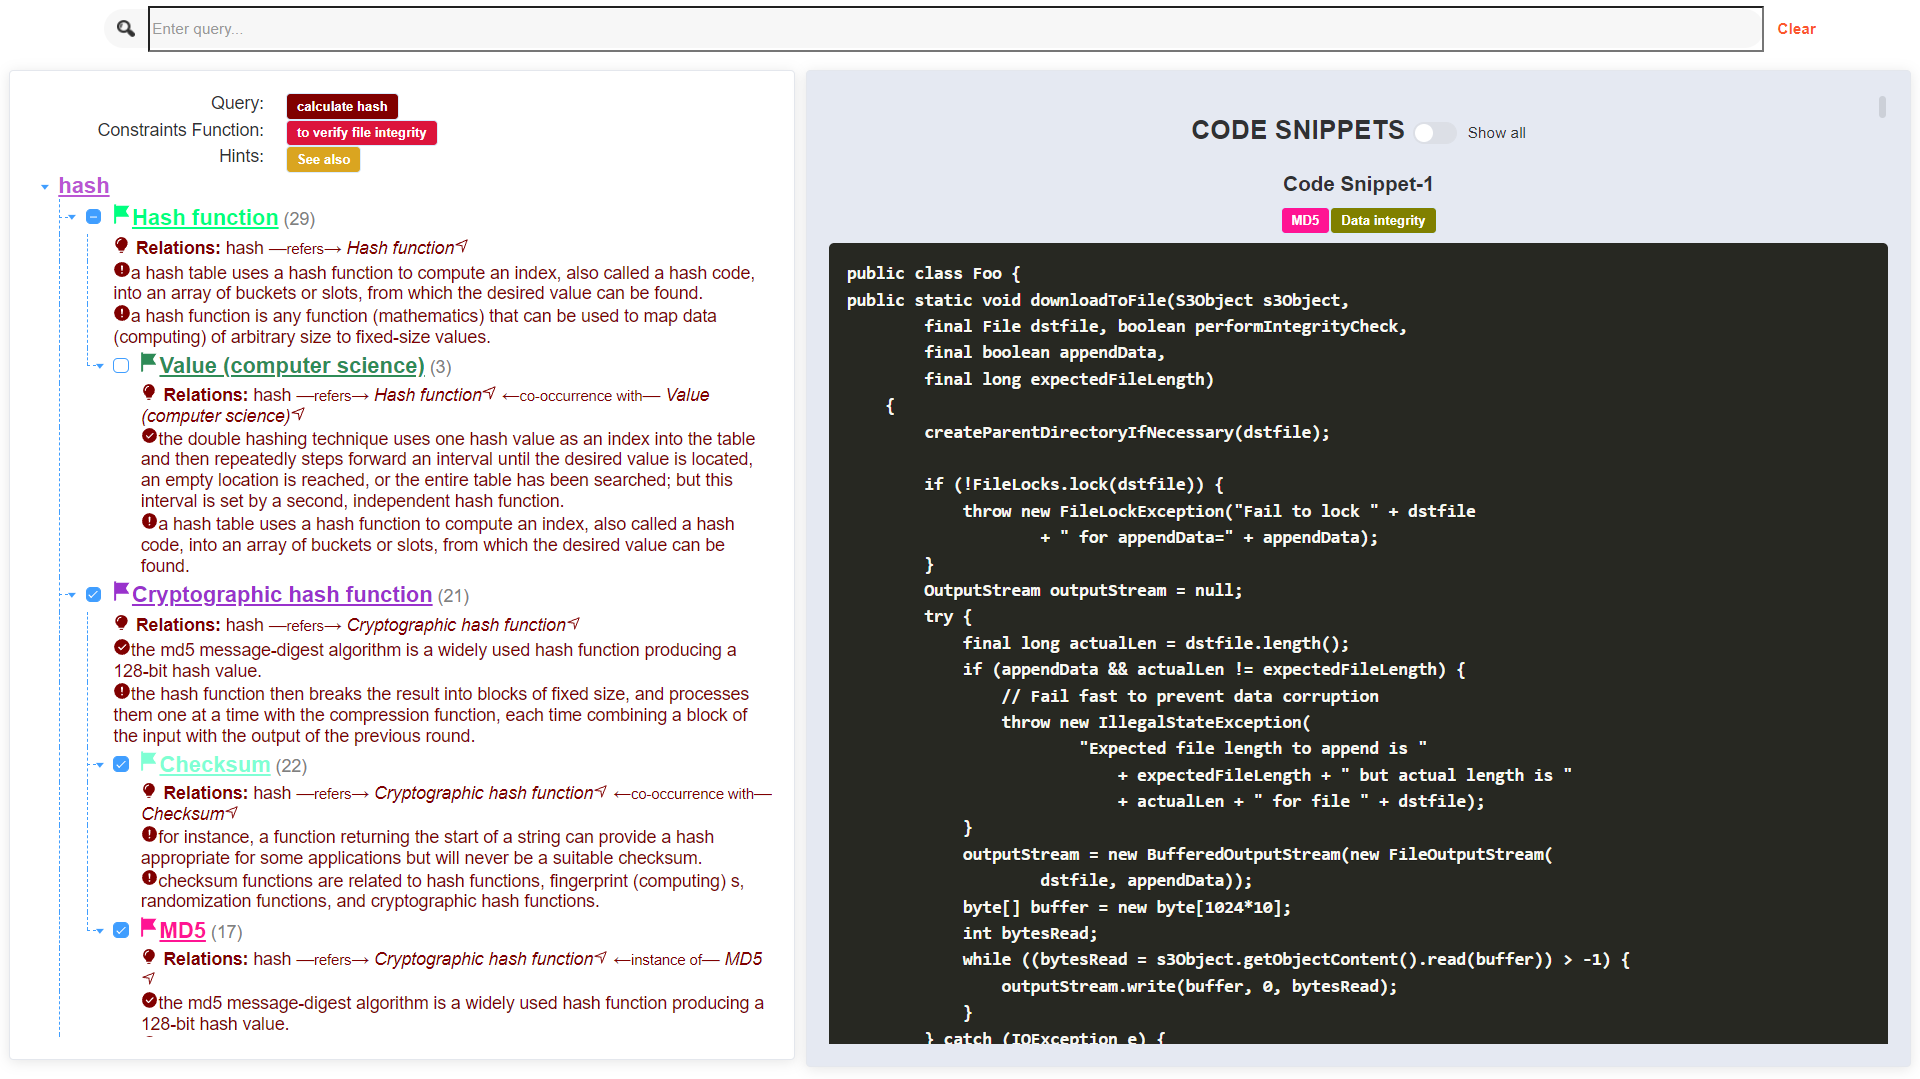
两周前,师兄要我完成一个前端的任务。因此我选择了较为熟悉的前端框架 Vue3 和配套的 UI 框架 ElementPlus,原型设计工具是 Figma。我最终实现的界面如下所示:
1. 简介 1.1 框架选择原因 (1) 选择 Vue3 的原因有如下几点:
方便搭建。依照官方给出的安装教程 ,
上手简单。只需要会一些 JavaScript 等前端开发的基础知识。
轻量级。越简单越好,这是我们的项目需求使然。我们的目标是创建一个简单的前端搜索和展示页面,不需要进行页面之间的跳转。虽然像 Vue 这样的框架构建的网页本质上就是单页面,但实际上对于复杂项目来说,Vue 也需要进行许多代码的编写。
在可视化前端中,除了像 Vue 和 Angular 这样的前端框架之外,还有 D3 这种小巧的 js 库。由于我对 D3 不熟悉,所以我最终还是选择了 Vue。
(2) 选择 ElementPlus 的原因有如下几点:
和 Vue3 配套。
有许多方便使用的组件。
风格统一。
当然,Element 存在许多便捷的组件,这也意味着它的灵活性大大降低。我在开发的过程中,花费了 60% 的时间调整组件带给我的不灵活之处。
1.2 个人习惯 英文报错搜谷歌 ,谷歌搜不到就搜 ElementPlus 在 Github 的 issues
代码的基本写法搜必应 ,必应搜不到就转换成英文搜谷歌 。鉴于我很长时间没有使用过 JavaScript 了,很多基本的数据结构的增删改查我不会使用,连循环都不会。中文版本的菜鸟教程 和 w3cschool 以及少量的 CSDN 就可以满足我的需求。虽然我一直骂 CSDN 坑人,但我目前搜中文编程的一些基础资料还是会偶尔参考一下 CSDN。
1.3 前端原型 我师兄使用 Figma
1.4 安装 虽然安装不是重点,但是我想有必要补充一下我的安装过程,以免未来遗忘。
(0) 在不安装 Vue3 的脚手架的情况下创建 Vue 应用(Vite 安装)
2022-11-17 更新:Vue3 官网 Vite 安装方式 。
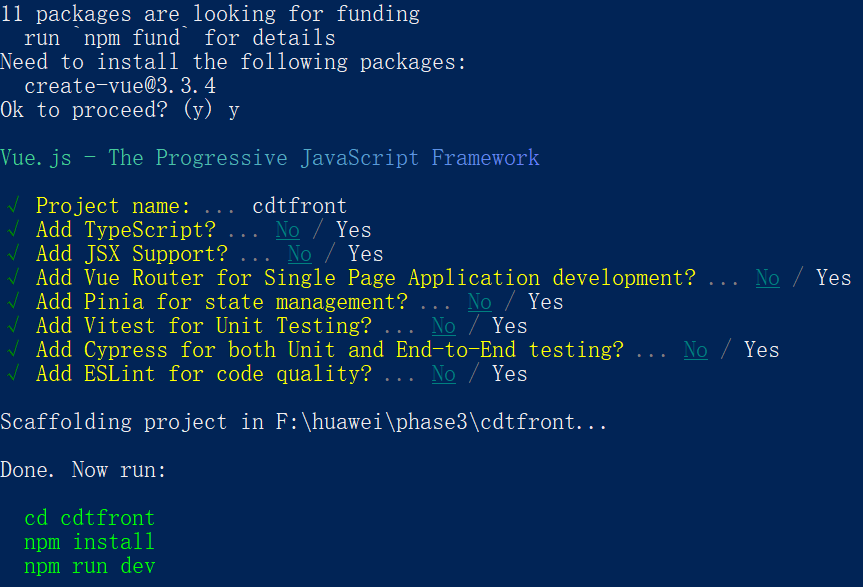
在安装好 npm 后,运行 npm init vue@latest 命令即可。
1
2
3
4
5
6
7
8
npm init vue@latest # 输入项目名称 cdtfront # ... 安装过程略,没有特殊需求的话,一路按 enter 即可。 cd cdtfront npm install npm run dev npm run serve # 运行项目 npm run build # 服务器部署所需
(1) 准备(脚手架安装) 以 Linux 版本为例。
1
2
3
# 已经有 node。没有 Node.js 则需要先装 Node.js sudo apt get npm # 安装 npm sudo npm install -g @vue/cli # 安装 Vue3 的脚手架
由于原系统环境中安装了 Vue2 的脚手架,所以需要进行下述命令来重新安装 Vue3:
1
2
3
4
sudo npm cache clean -f sudo npm install -g n sudo n stable sudo npm install -g @vue/cli
对于上面的命令,有必要解释部分词汇。
首先,按照 Node.js 官网 的定义“Node.js® is a JavaScript runtime built on Chrome’s V8 JavaScript engine. ” 用我师兄的话来说,Node.js 相当于为 JavaScript 提供了运行环境,类似于 Java 的 JVM。如果没有 Node.js,JavaScript 的运行必须依赖以 Chrome 内核为典型代表的浏览器引擎;有了 Node.js,开发人员不仅可以使用 JavaScript 来撰写前端,也可以使用 JavaScript 来撰写后端等,从而进行全栈开发。
其次,npm 是一个包管理工具,类似 Python 的 pip。
我的版本情况如下所示:
(2) 创建项目(脚手架安装) 1 2 3 vue create tool cd tool npm install @element-plus/icons-vue
(3) 运行项目 我们运行 Vue 项目需要熟知如下三个命令:
1 2 3 npm install npm run serve npm run build
(4) Windows 版本(脚手架安装) 1 2 3 4 sudo apt get npm sudo npm install -g @vue/cli vue create tool
(5) 其它
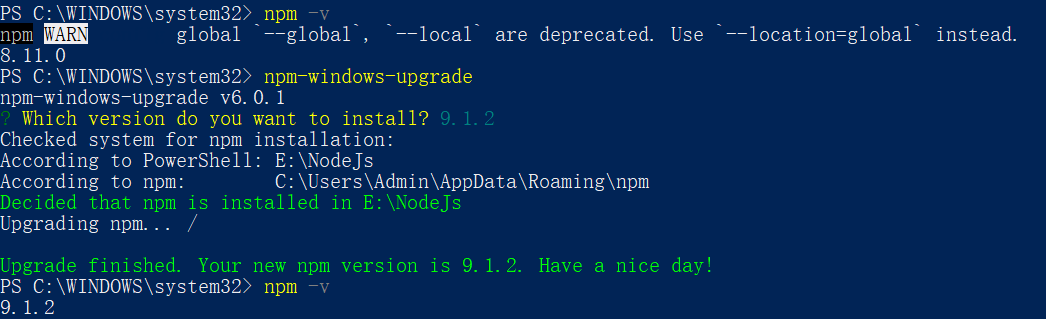
警告(Windows):npm WARN config global --global, --local are deprecated. Use --location=global instead.
解决方法:使用管理员身份运行 PowerShell,运行 npm-windows-upgrade。
查看 Vue 的版本:npm list vue
npm 太慢
解决方法 :使用淘宝镜像。
npm install -g cnpm --registry=https://registry.npmmirror.com
运行完上述命令后,即可使用 cnpm 替代 npm。
2. 必要的基础语言技能 前文已经述及,由于太久没有写过 HTML 等语言,我现在的相关技能已经退化至基本没有了,所以我进行必要的基础语言技能复建。
2.1 JavaScript 在 Vue3 中,JavaScript 代码被包裹在标签 <script> 中。
(1) 重要数据结构的基本方法 1 2 3 4 5 6 7 8 9 10 11 12 13 14 15 16 17 18 19 20 21 22 23 24 25 26 27 28 29 30 31 32 33 34 35 36 let arr1 = new Array ();let arr2 = [];let arr3 = [1 , 2 , 3 ];arr1.push (1 ); arr1.push ('aaa' , 'bbb' ); let lastItem = arr1.pop ()arr1 = arr1.concat (arr2) for (var i = 0 ; i < arr.length ; i++){ console .log (arr[i]); } arr.forEach (function (item, index ){ console .log (item + '|' + index); }); for (let i in arr){ console .log (arr[i]); } for (let item of arr){ console .log (item); }
1 2 3 4 5 6 7 8 9 10 11 12 13 14 15 16 17 18 19 20 let dict = new Object ();let dict = {};dict["one" ] = 1 ; for (let key in dict) { let value = dict[key]; } let sleep = function ( console .log ('Let us sleep!' ) } dict['rest' ] = sleep dict.rest ()
1 2 3 4 5 6 let set = new Set ()set.add (1 )
(2) 代码调试小技巧 当有不确定的代码时,可以先在浏览器的控制台直接输入代码 ,查看其效果。这样比较方便调试。
(3) JavaScript 动态生成 CSS 以一段项目中的代码为例:
1 2 3 4 5 6 7 8 9 10 addCSS (className, colorValue ) { let dotClassName = '.' + className let colorAttribute = 'color: ' + colorValue + ';' let style = document .createElement ('style' ); document .getElementsByTagName ('head' )[0 ].appendChild (style); if (!(style.sheet ||{}).insertRule ) (style.styleSheet || style.sheet ).addRule (dotClassName, colorAttribute); else style.sheet .insertRule (dotClassName + "{" + colorAttribute + "}" ,0 ); },
使用 document.getElementsByTagName('head') 获取页面中的 head 元素,然后在其后添加包含 CSS 代码的子节点。
2.2 CSS 在 Vue3 中,CSS 代码被包裹在标签 <style> 中。
使用选择器获取页面元素。
元素选择器根据元素名称来选择 HTML 元素。p
id 选择器使用 HTML 元素的 id 属性来选择特定元素。#id
类选择器选择有特定 class 属性的 HTML 元素。.classname
通用选择器()选择页面上的所有的 HTML 元素。` `
分组选择器选取所有具有相同样式定义的 HTML 元素。p, h1, h2
上述选择器是基础用法,我们可以使用逻辑组合伪类。比如元素的最后一个节点:p:last-child。类似的用法可以在用到的时候进行查询。
2.3 HTML 在 Vue3 中,HTML 代码被包裹在标签 <template> 中。
3. 常见问题及解决方式 3.1 不同组件传值 (1) 子组件向父组件传值: emit App.vue1 2 3 4 5 6 7 8 9 10 11 12 13 14 15 16 17 18 19 20 21 22 23 24 25 26 27 28 <template> <h1>{{ title }}</h1> <Child @childVariableName="parentMethod($event)" /> </template> <script> import Child from "./components/Child" export default{ name:'App', components: { Child, }, data() { return{ title:'Old Title' } }, methods:{ parentMethod(title) { this.title = title; }, } </script> <style> </style>
Child.vue1 2 3 4 5 6 7 8 9 10 11 12 13 14 15 16 17 18 <template lang="html"> <button type="button" @click='childMethod'> Update me </button> </template> <script> export default { name:'Child', methods:{ childMethod() { this.$emit('childVariableName', 'New Title') } } } </script> <style scoped> </style>
(2) 子组件向父组件传递多个值 将 App.vue 中的 <Child @childVariableName="parentMethod($event)" /> 改为 <Child @childVariableName="parentMethod" />,将 Child.vue 中的 this.$emit('childVariableName', 'New Title') 改为 this.$emit('changeTitle', data1, data2, ...)
(3) 父组件向子组件传值: Props Parent.vue
1 2 3 4 5 6 7 8 9 10 11 12 13 14 15 16 17 18 19 <template> <h1>{{ title }}</h1> <Child childValue="This is parent value" /> </template> <script> import Child from "./components/Child" export default{ name:'Parent', components: { Child, }, data() { return{ parentValue: 'Parent Value' } } </script>
Child.vue
1 2 3 4 5 6 7 8 9 10 11 <template lang="html"> {{ childValue }} </template> <script> export default { name:'Child', props: ['childValue'] } </script>
如果所传的值是个变量,需要在变量前加冒号 :
Parent.vue
1 2 3 4 5 6 7 8 9 10 11 12 13 14 15 16 17 18 19 <template> <h1>{{ title }}</h1> <Child :childValue="parentValue" /> </template> <script> import Child from "./components/Child" export default{ name:'Parent', components: { Child, }, data() { return{ parentValue: 'Parent Value' } } </script>
Child.vue
1 2 3 4 5 6 7 8 9 10 11 <template lang="html"> {{ childValue }} </template> <script> export default { name:'Child', props: ['childValue'] } </script>
通过 props 从父节点传递到子节点的数据值是不可更改的,因此如果想要对该数值进行修改等操作,需要通过重新定义一个新的变量来复制该数据,进而对新变量进行操作。
Child.vue
1 2 3 4 5 6 7 8 9 10 11 12 13 14 15 16 17 18 19 20 21 <template lang="html"> {{ childValue }} </template> <script> export default { name:'Child', props: ['childValue'], data() { return { copiedChildValue: childValue } }, methods: { updateValue(newValue) { this.copiedChildValue = newValue } } } </script>
(4) 父子组件之间值的动态变化 当子组件构建完毕后,父组件传递的值发生了变化,此时子组件是不会发生变化的。为了能让子组件相应父组件的变化,我们必须借助生命周期函数 watch 来监视该变量的变化。
Parent.vue
1 2 3 4 5 6 7 8 9 10 11 12 13 14 15 16 17 18 <template> <h1>{{ title }}</h1> <Child :childValue="parentValue" /> </template> <script> import Child from "./components/Child" export default{ name:'Parent', components: { Child, }, data() { return{ parentValue: 'Parent Value' } } </script>
Child.vue
1 2 3 4 5 6 7 8 9 10 11 12 13 14 15 16 17 18 19 20 21 22 23 24 25 26 27 28 29 30 31 <template v-if='showValue'> {{ childValue }} </template> <script> export default { name:'Child', props: ['childValue'], data() { return{ parentValue: 'Parent Value', showValue: false, } } watch: { // 被监听的对象 childValue: { immediate: true, handler (newValue) { // 销毁当前组件 this.showValue = false this.$nextTick(() => { this.parentValue = newValue this.showValue = true }) } } } } </script>
(5) 非父子节点传值 我的做法是在两个组件的共同父组件中进行数值的转发。这样做的原因是这两个节点属于兄弟节点,它们的关系比较密切。实际上还有其他的官方发布的非父子组件间的传值方案 。
目前还没有尝试过。
3.2 钩子函数 关于 computed、methods、watch,mounted 区别见此处链接
computed是在HTML DOM加载后马上执行的,如赋值;
methods则必须要有一定的触发条件才能执行,如点击事件;
watch呢?它用于观察Vue实例上的数据变动。对应一个对象,键是观察表达式,值是对应回调。值也可以是方法名,或者是对象,包含选项。所以他们的执行顺序为:默认加载的时候先computed再watch,不执行methods;等触发某一事件后,则是:先methods再watch。
mounted 是生命周期
created和mounted区别?
watch 同时监听多个值 首先使用 computed 定义一个复合对象吧,然后再对该对象进行 watch。
1 2 3 4 5 6 7 8 9 10 11 12 13 14 15 16 17 18 19 20 21 22 export default { ..., computed : { propsVariables ( const { val1, val2 } = this return { vall1, val2 } } }, watch : { propsVariables : { immediate : true , deep : true , handler (newValue) { console .log (newValue.val1 , newValue.val2 ) } }, } }
3.3 ElementPlus 组件的属性、方法、事件、插槽及样式修改 这一部分可以重点关注官方文档。由于我在此次项目中重点使用了 Vue3 的树 ,所以我以对 Vue3 的树进行样式修改为例。
(1) 属性 属性是指在 element 组件的基础上,在其元素上添加给定的属性,以提高其灵活性。
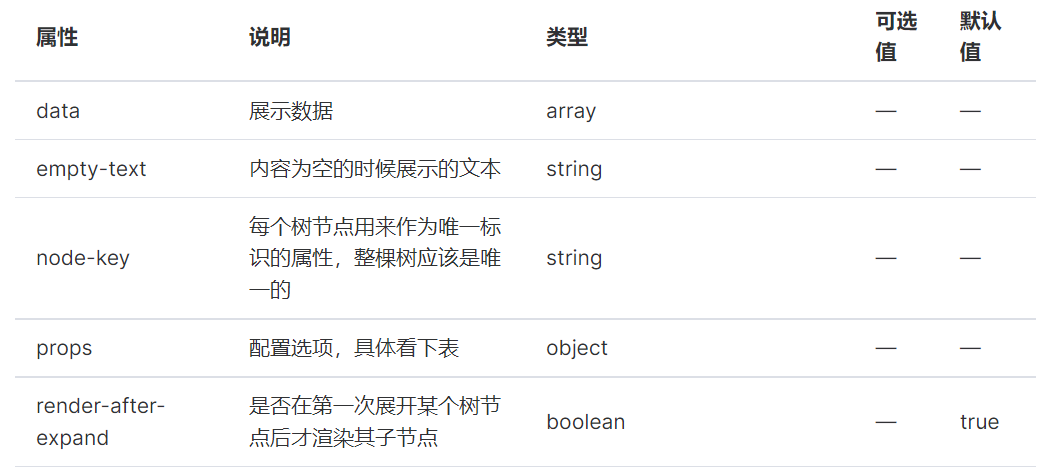
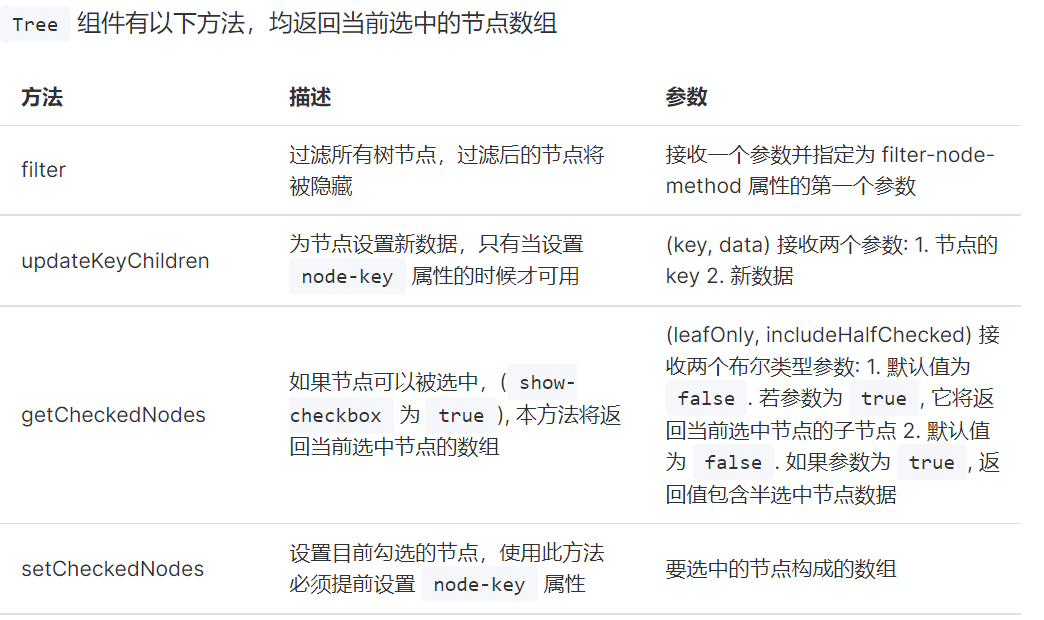
Tree 组件的属性节选如下:
在构建树的时候,我们可以直接将常量或变量复制给特定的属性。data、empty-text、show-checkbox 等值。
1 2 3 4 5 6 7 8 9 10 11 12 13 14 15 16 17 18 19 20 21 22 23 24 25 26 27 28 29 30 31 <template> <div> <div class="grid-content" style="text-align: left"> <el-tree v-if="showReady" :data="[treeHierarchy]" :ref="treeName" empty-text='No Results' show-checkbox node-key="id" indent="25" default-expand-all :default-checked-keys='[rootId]' :props="{ children: 'children', label: 'name', class: customNodeClass, }" @check-change="handleCheckChange" > <template v-slot:default="{ node }"> <div class="custom-node" style='word-wrap:break-word;' > <!-- content --> {{ node.label }} </template> </el-tree> </div> </div> </template>
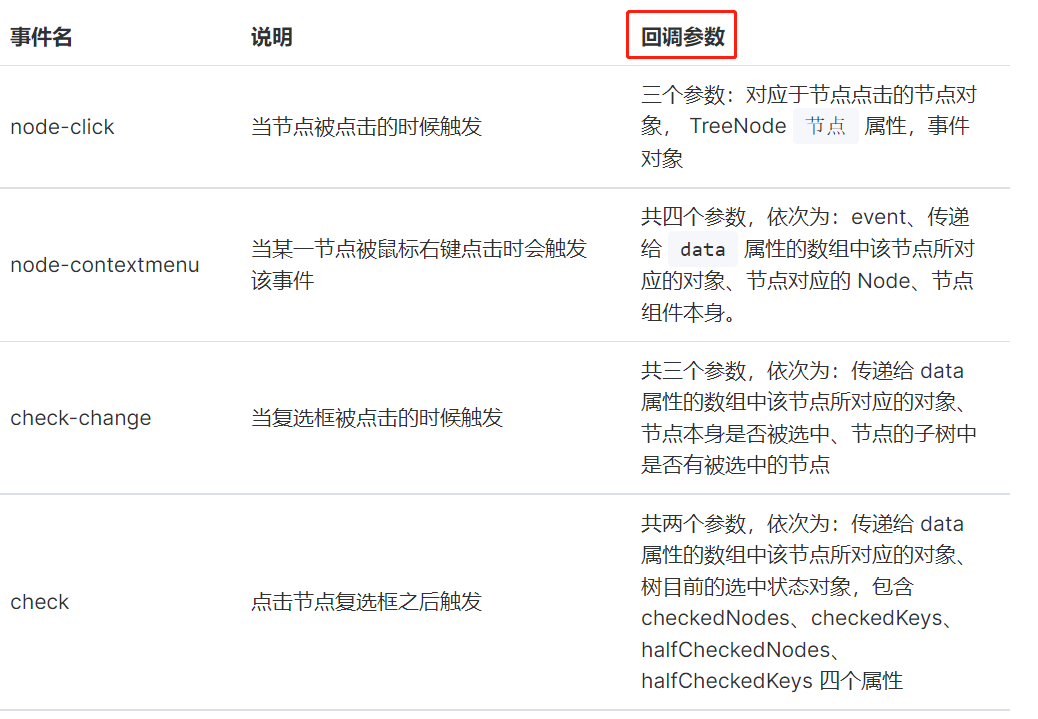
(2) 方法 Tree 组件的方法节选如下:
在使用 Tree 组件的时候,我们需要先获取 Tree 组件,在下面的代码里,我通过 ref 属性给 Tree 组件添加了一个名字,在 methods 中添加了一行代码 let retNodes = this.$refs['treename'].getCheckedNodes() 以获取当前选中的节点数组。之所以可以调用 getCheckedNodes() 方法是因为在文档中清晰地告知了可以使用该方法。但是我一开始没有看明白文档中方法的使用方式,所以在查找资料上花费了很多时间。
1 2 3 4 5 6 7 8 9 10 11 12 13 14 15 16 17 18 19 20 21 22 23 24 25 26 27 28 29 30 31 32 33 34 35 36 37 38 39 40 41 42 43 44 45 46 47 48 49 50 51 52 53 54 55 56 57 58 59 60 61 62 63 64 65 66 67 68 69 70 71 72 73 74 75 76 77 <template> <el-tree :data="data" show-checkbox ref='treename' node-key="id" :default-expanded-keys="[2, 3]" :default-checked-keys="[5]" :props="defaultProps" /> </template> <script lang="ts" setup> const defaultProps = { children: 'children', label: 'label', } const data = [ { id: 1, label: 'Level one 1', children: [ { id: 4, label: 'Level two 1-1', children: [ { id: 9, label: 'Level three 1-1-1', }, { id: 10, label: 'Level three 1-1-2', }, ], }, ], }, { id: 2, label: 'Level one 2', children: [ { id: 5, label: 'Level two 2-1', }, { id: 6, label: 'Level two 2-2', }, ], }, { id: 3, label: 'Level one 3', children: [ { id: 7, label: 'Level two 3-1', }, { id: 8, label: 'Level two 3-2', }, ], }, ] export default: { methods: { test() { let retNodes = this.$refs['treename'].getCheckedNodes() console.log(retNodes) } } } </script>
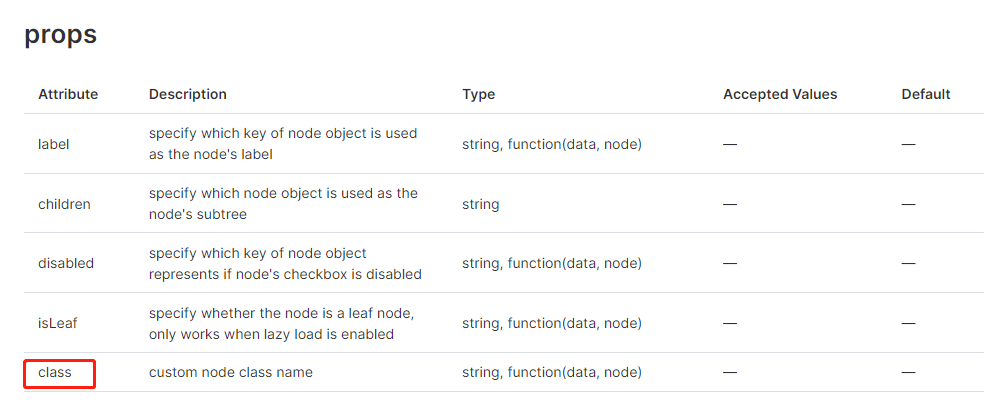
(3) 事件 Tree 组件的事情节选如下:
回调参数的意思是,如果我们调用事件,那我们就可以获得 Tree 组件包装的函数的返回值。以 check-change 函数为例,我们自定义一个函数 handleCheckChange,当复选框被点击的时候,handleCheckChange 函数就会被执行。
1 2 3 4 5 6 7 8 9 10 11 12 13 14 15 16 17 18 19 20 21 22 23 24 25 26 27 28 29 30 31 32 33 34 35 36 37 38 39 40 41 42 43 44 45 46 47 48 49 50 51 52 53 54 55 56 57 58 59 60 61 62 63 64 65 66 67 68 69 70 71 72 73 74 75 76 77 <template> <el-tree :data="data" show-checkbox ref='treename' node-key="id" :default-expanded-keys="[2, 3]" :default-checked-keys="[5]" :props="defaultProps" @check-change="handleCheckChange" /> </template> <script lang="ts" setup> const defaultProps = { children: 'children', label: 'label', } const data = [ { id: 1, label: 'Level one 1', children: [ { id: 4, label: 'Level two 1-1', children: [ { id: 9, label: 'Level three 1-1-1', }, { id: 10, label: 'Level three 1-1-2', }, ], }, ], }, { id: 2, label: 'Level one 2', children: [ { id: 5, label: 'Level two 2-1', }, { id: 6, label: 'Level two 2-2', }, ], }, { id: 3, label: 'Level one 3', children: [ { id: 7, label: 'Level two 3-1', }, { id: 8, label: 'Level two 3-2', }, ], }, ] export default: { methods: { handleCheckChange(data1, data2) { console.log(data1, data2) } } } </script>
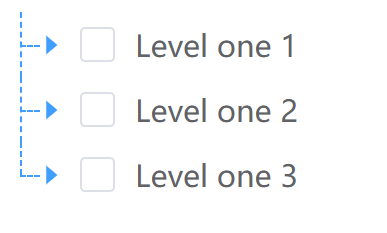
(4) 插槽 ElementPlus 的插槽。仍旧以 Tree 组件为例,我想要修改树上每个节点的内容,那我就可以通过插槽对其样式进行修改。下面我决定将节点上的字变为红色。当然,我们也可以在 slot 中添加图标或任何其他想要的内容。
1 2 3 4 5 6 7 8 9 10 11 12 13 14 15 16 17 18 19 20 21 22 23 24 25 26 27 28 29 30 <el-tree v-if ="showReady" :data ="[treeHierarchy]" :ref ="treeName" show-checkbox node-key ="id" default-expand-all :default-checked-keys ='[rootId]' :props ="{ children: 'children', label: 'name', class: customNodeClass, }" @check-change ="handleCheckChange" > <template v-slot:default ="{ node }" > <element-tree-line :node ="node" :showLabelLine ="true" indent ="25" > <div class ="custom-node" style ='word-wrap:break-word;' > <span color ='red' > {{ node.label }}</span > </div > </element-tree-line > </template > </el-tree >
v-slot 就是我们放进去的插槽。其实,v-slot 是 Vue2 的写法,Vue3 的新写法是 <template #default="scope">。
(5) CSS 修改 对于给定的组件,我们经常需要对其进行修改。因为官方的组件虽然做了很多基础的工作,但也给了很多限制。对 CSS 的样式进行修改这一部分内容我们需要知晓如下两种情况。
1. CSS 添加 class 以 Tree 组件为例,我在 props 里为其添加了 class。
在 class 中,如果有 no-check-node,节点就不会显示复选框。
1 2 3 4 5 6 7 8 9 10 11 12 13 14 15 16 17 18 19 20 21 22 23 24 25 26 27 28 29 30 31 32 33 34 35 36 37 38 39 40 41 42 43 44 45 46 47 48 49 50 51 52 <template> <div class="grid-content" style="text-align: left"> <el-tree :data="[treeHierarchy]" :ref="treeName" empty-text='No Results' show-checkbox node-key="id" default-expand-all :default-checked-keys='[rootId]' :props="{ children: 'children', label: 'name', class: customNodeClass, }" @check-change="handleCheckChange" /> </div> </template> <script> // 给节点添加class const customNodeClass = (data) => { let ret = data.colorClass // 针对描述型的节点不显示其复选框 if (undefined === nodeType || nodeType !== 'Notion') { ret += ' no-checkbox-node'; } return ret; }; export default { name: 'MyTree', components: { ElementTreeLine: getElementLabelLine(h) }, props: { 'treeHierarchy': { require: true }, 'treeName': { require: true }, 'rootId': { require: true }, }, data() { return { customNodeClass, } }, </script>
除了借助已有的 class 外,我们也可以自己新建 class,添加至 HTML 元素上,然后编写 CSS 代码对元素的表现形式进行控制。
2. less 和 sass 在查找 Vue3 和 ElementPlus 的资料时,搜索引擎给了我许多 Vue2 和 ElementUI 的资料,有一部分不可以使用在新版本上,但是还有一部分是可以类推到新版本上。其中,许多样式的修改使用到了 less。使用 less 之前需要先下载 less-loader 。
1 npm install --save-dev less-loader less
在开发完成后,我们需要将 less 代码转换为 CSS。
首先sass和less都是css的预编译处理语言,他们引入了mixins,参数,嵌套规则,运算,颜色,名字空间,作用域,JavaScript赋值等 加快了css开发效率,当然这两者都可以配合gulp和grunt等前端构建工具使用
sass和less主要区别:在于实现方式 less是基于JavaScript的在客户端处理 所以安装的时候用npm,sass是基于ruby所以在服务器处理。
很多开发者不会选择LESS因为JavaScript引擎需要额外的时间来处理代码然后输出修改过的CSS到浏览器。关于这个有很多种方式,我选择的是只在开发环节使用LESS。一旦我完成了开发,我就复制然后粘贴LESS输出的到一个压缩器,然后到一个单独的CSS文件来替代LESS文件。另一个选择是使用LESS.app来编译和压缩你的LESS文件。两个选择都将最小化你的样式输出,从而避免由于用户的浏览器不支持JavaScript而可能引起的任何问题。尽管这不大可能,但终归是有可能的。LESS与SASS的区别
3.4 工具 前端展示的代码高亮工具 选择了 Prism.js。详细解释见如下两个链接:Prism.js 官网链接 、Prism.js 简单使用文档
1 2 3 4 5 6 7 8 9 <template> <pre class ="language-java" > <code class ="language-java" > <b > {{ code }}</b > </code > </pre > <template> <style > import Prism from "prismjs"; Prism.highlightAll () </style >
3.5 报错与特定功能实现 (1) Vue3 文件导入 JavaScript 文件的值 1 import { importedVariable } from 'data'
千万不可以少两个花括号 import variable from 'data',不然无法识别。
上面的代码生效的前提是,只有在 data.js 中有默认导出的 export default 语法时才会生效。也就是说,data.js 中有如下代码:
1 2 3 4 let importedVariable = 'importedVariable' export default { importedVariable }
(2) export default 和 export 的区别 作用 export 和 export default 实现的功能相同,即:可用于导出(暴露)常量、函数、文件、模块等,以便其他文件调用。
区别 1、export 导出多个对象,export default 只能导出一个对象
2、export 导出对象需要用 { },export default 不需要 { },如:
export { A,B,C };
export default A;
3、在其他文件引用 export default 导出的对象时不一定使用导出时的名字。因为这种方式实际上是将该导出对象设置为默认导出对象,如:
假设文件 A、B 在同级目录,实现文件 B 引入文件 A 的导出对象 deObject:
文件 A:export default deObject
文件 B:import deObject from ‘./A’
或者:
import newDeObject from ‘./A’
(3) Vue3 无法正常显示图标 el-icon 我首先通过 npm 全局导入 element-icon(icon 导入方式 ),运行命令 npm install @element-plus/icons-vue ,图标不显示。
在 icon 的代码复制界面 选择“Copy svg content”,即可复制该代码的 svg 值,随后我们将其复制在我们需要的 HTML 代码中。
(4) Vue3 不显示 element-tree 原因一:<style> 下使用了 methods 中的方法,导致找不到方法,所以 el-tree 无法显示。
原因二:传进去的 data 不是 listUncaught (in promise) TypeError: children.indexOf is not a function。
(5) Vue3 文件中定义了两个同名全局变量 报错:error Duplicated key,详见解释 。
(6) 设置全部节点默认选中 实际上仅需设置选中根节点。
1 :default-checked-keys='[rootId]'
在 Tree 组件中添加属性 default-checked-keys,rootId 是一个变量,表示根节点。
(7) 控制链接的大小和颜色 1 2 3 4 5 6 7 8 9 a { color : inherit; } a :link , a :visited { text-decoration : none; } a :hover { text-decoration : underline; }
(8) 在 Tree 组件上添加虚线 安装网友写的插件 element-tree-line。
1 2 3 4 5 6 7 8 9 10 11 12 13 14 15 16 17 18 19 20 21 22 23 24 25 26 27 28 29 30 31 32 33 34 35 36 37 38 39 40 41 42 43 44 45 46 47 48 49 50 51 52 53 54 55 56 57 58 59 60 61 62 63 64 65 66 67 68 69 70 71 72 73 74 75 76 77 78 79 80 81 82 83 84 85 86 87 88 89 90 91 92 93 94 95 96 97 98 99 100 101 102 103 104 105 106 107 108 109 110 111 112 113 <template> <el-tree :data="data" show-checkbox node-key="id" draggable :default-expanded-keys="[2, 3]" :default-checked-keys="[5]" :props="defaultProps" :indent="treeIndent" ><template v-slot:default="{ node }"> <element-tree-line :node="node" :indent="treeIndent" > <template v-slot:node-label> <span style="font-size: 12px"> {{ node.label }} </span> </template> </element-tree-line> </template> </el-tree> </template> <script> import { getElementLabelLine } from 'element-tree-line'; import 'element-tree-line/dist/style.css'; import { h } from 'vue'; export default { name: 'App', components: { ElementTreeLine: getElementLabelLine(h) }, data() { return { treeIndent: 30, data: [ { id: 1, label: 'Level one 1', children: [ { id: 4, label: 'Level two 1-1', children: [ { id: 9, label: 'Level three 1-1-1', }, { id: 10, label: 'Level three 1-1-2', }, ], }, ], }, { id: 2, label: 'Level one 2', children: [ { id: 5, label: 'Level two 2-1', }, { id: 6, label: 'Level two 2-2', }, ], }, { id: 3, label: 'Level one 3', children: [ { id: 7, label: 'Level two 3-1', }, { id: 8, label: 'Level two 3-2', }, ], }, ], defaultProps: { children: 'children', label: 'label', }, }; }, }; </script> <style> .element-tree-node-line-hor { border-bottom: 1px dashed #409eff; } .element-tree-node-line-ver { border-left: 1px dashed #409eff; } .element-tree-node-line-ver.last-node-line { border-left: 1px dashed transparent; } .element-tree-node-line-ver.last-node-isLeaf-line { height: 50%; } .element-tree-node-label-line { border: 0px; } .el-tree-node__expand-icon { color: #409eff } </style>
上述代码效果图如下:
(9) 元素和页面一样高 使用 height='100vh'。